Wireless DS TX
The Wireless DS TX Cart is a DS/DS Lite peripheral that converts a DS into a wireless controller compatible with the insideGadgets wireless controller ecosystem. It supports fully remapping any button to any other button including multi-button macros. It also provides four extra on screen touch buttons.
Buy the Wireless DS TX Cart here
Download the Wireless DS TX Software here
Using the Wireless DS TX
The Wireless DS TX requires a DS flashcart like the R4 in order to run the controller software. The process will vary between flashcarts but for most carts it is sufficient to copy the nds file onto an SD card that is inserted into the flashcart. Insert the flashcart into the top of the DS (slot 1) and the Wireless DS TX Cart into the bottom of the DS (slot 2). Launch the nds file and the following should be shown on the bottom screen.
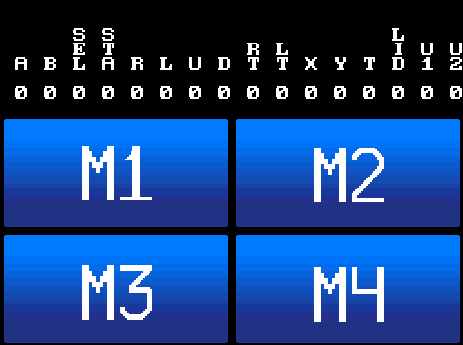
At this point, the DS will be sending out all button presses to any compatable Wireless RX product. If you don’t want custom keybindings or extra features you may stop here.
Configuring the Wireless DS TX
The Wireless DS TX supports full key remapping, full macros, turbo, and several convenience functions. These are all controlled through the JSON configuration file. The file is a list describing what should happen on each keypress. An example is shown below.
{
    "M1": [ "SLEEP" ],
    "M2": [ "A", "B", "START", "SELECT" ],
    "LT": [ "A" ],
    "X": [ "B" ]
}
This specific configuration does the following. Button M1 turns off the DS’s screens. Button M2 presses A, B, Start, and Select all at the same time. The left trigger maps to the A button and the X button maps to the B button. Any unspecified mapping uses the default. The table below shows all possible buttons and their defaults. Any name in this table may be listed on the left side of the : in the configuration file.
| Name | Description | Default |
|---|---|---|
| A | The A button | A |
| B | The B button | B |
| X | The X button | X |
| Y | The Y button | Y |
| UP | The up button on the dpad | UP |
| DOWN | The down button on the dpad | DOWN |
| LEFT | The left button on the dpad | LEFT |
| RIGHT | The right button on the dpad | RIGHT |
| LT | The left trigger | LT |
| L | The left trigger. Same as LT | LT |
| RT | The right trigger | RT |
| R | The right trigger. Same as RT | RT |
| M1 | The on screen M1 button | A |
| M2 | The on screen M2 button | B |
| M3 | The on screen M3 button | X |
| M4 | The on screen M4 button | Y |
The right side of the : may be one or more commands surrounded by quotes, separated by a ,, and inside of []. Each command has a different effect. They are all listed below. Note: Pressing all four directions at once ("A": [ "UP", "DOWN", "LEFT", "RIGHT" ]) is reserved for internal use and will cause unexpected things to occur.
| Name | Description |
|---|---|
| A | Press the A button |
| B | Press the B button |
| X | Press the X button |
| Y | Press the Y button |
| UP | Press the up button on the dpad |
| DOWN | Press the down button on the dpad |
| LEFT | Press the left button on the dpad |
| RIGHT | Press the right button on the dpad |
| LT | Press the left trigger |
| L | Press the left trigger. Same as LT |
| RT | Press the right trigger |
| R | Press the right trigger. Same as RT |
| SLEEP | Turn off both screens to save power. Touch the bottom screen to turn them back on |
| TURBO | Rapidly press all the other buttons in this binding |
| TOGGLE | Switches betweeen holding and releasing the buttons in this binding |
| MACRO | Trigger the defined macro. See here |
| NONE | Do nothing. Clears the default value for a button |
| SET_CHANNEL_1 | Sets the wireless communication to channel 1. Note any value from 1-125 may be used for SET_CHANNEL |
| SET_CHANNEL_2 | Sets the wireless communication to channel 2. Note any value from 1-125 may be used for SET_CHANNEL |
| SET_CHANNEL_125 | Sets the wireless communication to channel 125. Note any value from 1-125 may be used for SET_CHANNEL |
Uploading the configuration file
After writing your configuration file in your favorite text editor, you are ready to upload it for the software to use. This is a good time to run a quick checklist on the file. Ensure everything in the file is in ALL_CAPS, ensure the file is valid JSON of the correct structure, and ensure no commands have typos. The mapping won’t work correctly and will need to be reuploaded if anything in the config is incorrect. To upload, save the file as wds_tx.json (the name must exactly match) and then copy it to the root of the SD card. It must be in the root in order to be found. After that you can eject the SD cart, reinsert the flashcart, and relaunch the software.
